A short bit of film from Youtube of the type of howitzer used by 140 SB.
Note the number of gun crew involved [10 men].
Also note the roof tiles falling off the barn, due to the concussion, when the howitzer fires near the end of the film.
https://www.youtube.com/watch?v=DY5Zx10gunM
Peninsular Hussar
Thursday, April 6, 2017
14 HAG actions April 1917.
April 4th. 34 SB, also at Morchies, had 7 men killed and 9 wounded.
April 6th. 1194 SB had 2 howitzers destroyed.
April 7th. The whole of 14 HAG fired about 1,000 rounds on the Hindenburg Line. Wire cutting, grazing type shells, in preparation for the 5th Australian Divisions attack.

April 6th. 1194 SB had 2 howitzers destroyed.
April 7th. The whole of 14 HAG fired about 1,000 rounds on the Hindenburg Line. Wire cutting, grazing type shells, in preparation for the 5th Australian Divisions attack.

Locations of the 4 Siege Batteries in 14 HAG.
Monday, April 3, 2017
Fourth Battery Move.
140 Siege Battery RGA. 3rd April 1917.
14 HAG is now 34 SB, 88 SB, 140 SB and 194 SB.
The battery moved forward about 3 miles, to the small village of Morchies.
Another over night move in heavy snow.
All in action and targets registered by dawn.


14 HAG is now 34 SB, 88 SB, 140 SB and 194 SB.
The battery moved forward about 3 miles, to the small village of Morchies.
Another over night move in heavy snow.
All in action and targets registered by dawn.


Morchies today.


Sunday, March 26, 2017
Third Battery Move.
140 Siege Battery RGA. 26th March 1917.
The battery now moves to Beugnatre. North west of Bapaume. A move made during two nights of about 5 miles.


The battery now moves to Beugnatre. North west of Bapaume. A move made during two nights of about 5 miles.

They were now back in range of the Germans and start firing again in support of the Australian attack on Lagnicourt. They had not fired for over a week.

The ruins of the Lagnicourt Church, showing the
extensive shell damage the building sustained. Australian troops fought many
desperate engagements with German forces around this area. (AWM E04580).
Tuesday, March 21, 2017
Joining the ANZACs
140 Siege Battery RGA. 21st March 1917.
My Grandad's battery is transfered from 36 HAG to 14 HAG under the command of 1st ANZAC Corps due to army reorganisations as the war moves on and more units are moved north to the Ypres front.
14 HAG comprised of 33 SB, 34 SB, 42 SB, 88 SB, 140 SB and 194 SB.
Worn as a distinguishing unit indication at the head of each sleeve for 36 Australian Heavy Artillery Group from 1917 to 1918 and 36 Australian Heavy Artillery Brigade from 1918 to 1919.
My Grandad's battery is transfered from 36 HAG to 14 HAG under the command of 1st ANZAC Corps due to army reorganisations as the war moves on and more units are moved north to the Ypres front.
14 HAG comprised of 33 SB, 34 SB, 42 SB, 88 SB, 140 SB and 194 SB.
 |
| ANZAC artillery 'Zig Zag' flash. |
Wednesday, March 15, 2017
Second Battery Move.
140 Siege Battery RGA. 15th March 1917.
With the Germans continuing to fall back the battery was almost out of range. It was time to move forward again. Two howitzers joined 115 SB at Le Sars and the other two were on the road to Le Sars. This was an advance of just over 3 miles. See Somme map of 30/10/16 for the position of Le Sars. Corps Commander visits and praises them for their good shooting. Heavy snow. Lots of men needed to work on the light railway, extending it to the new positions.

With the Germans continuing to fall back the battery was almost out of range. It was time to move forward again. Two howitzers joined 115 SB at Le Sars and the other two were on the road to Le Sars. This was an advance of just over 3 miles. See Somme map of 30/10/16 for the position of Le Sars. Corps Commander visits and praises them for their good shooting. Heavy snow. Lots of men needed to work on the light railway, extending it to the new positions.
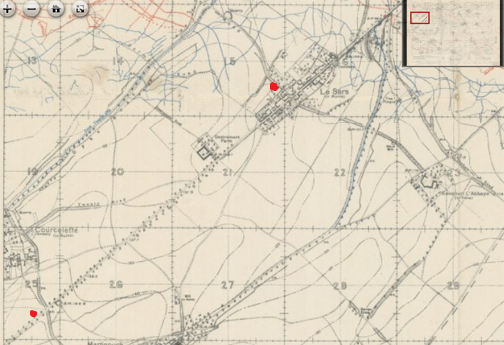
The two positions marked in red.
Friday, February 24, 2017
First Battery Move.
140 Siege Battery RGA. 25th February 1917.
November 1916:
Mainly supporting 19th Division, firing about 200 rounds per day. Very muddy and under fire from gas shells.
December:
The light railway supplying their ammunition was badly shelled. Ammo limited to 30 rounds per day.
January 1917:
Supporting the 11th Div firing 30 rounds per hour all day [8th Jan] and nearly 500 on Jan 11th. Very cold -10C. A German plane [Albatross] was brought down and they captured the pilot and navigator. More snow.
February:
No:4 Squadron RFC spotting for them.
As the Germans fell back at the end of the Battle of the Somme, the heavy guns advanced to keep in range. 140 SB moved from the Authuille Wood position on 25th February 1917 to a new position, Mouquet Farm, not far from Thiepval.
The battery was still part of 36 [Australian] HAG [Heavy Artillery Group] and contained the following siege batteries: 54 SB [Australian], 56 SB, 115 SB and 140 SB.

Red flag marks the new battery position. Map ref R33a07.

The battery move from grid 12 to grid 33, about a mile.
Subscribe to:
Posts (Atom)