A little back ground to the battery my Grandfather joined.
Battery History.
140th
Siege Battery, R.G.A. was formed on 22/5/1916.
140 SB was formed at Sheerness, one of ten new siege batteries formed in
May 1916. This was a modern, mechanised battery [not horse drawn] and went out
to the western front in August 1916, one of 25 new Siege Batteries sent out
that month. Its armament was 4 x 6”
Howitzers of the new 26 cwt type.
140 SB
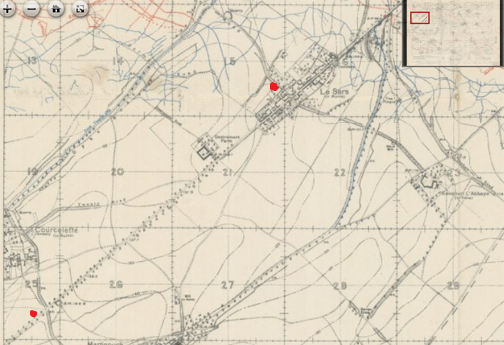
was sent to the Somme to join 15 Heavy Artillery Group [HAG] 7-8-16, was moved
to 36 [Australian] HAG 10-9-16 under the command of 2nd Corps and joined 14 HAG 21-3-17 under the command of 1st
ANZAC Corps.
The
battery commander was Maj A.G.C.Smythe who was also the OC of 36 HAG at one
point.
Battery Equipment.
4 x 6” Howitzers of the new 26 cwt type.
Rapidly developed
at the beginning of the war, its combination of firepower, range and mobility
(for its day) made it one of the British Empire's most important weapons in the
war.
Over 3,600 were made and they were still in use at the end
of WW2.
Crewed by 10 men, it could fire two, 100 lb shells, per
minute, up to 5½ miles. They fired over
22 million shells on the Western Front alone.
The 106E percussion fuse was introduced in 1917 - its
sensitive 'graze' action allowed it to explode on the surface and clear wire
entanglements effectively.
Transport
for a mechanised 6” How battery consisted of:-
4 x quadruple driven lorries [gun tractors]
13 x 3-ton lorries
1 x motor car
7 x motorcycles
This was broken down as follows:-
For the Guns and their equipment….4 quadruple driven lorries….8 drivers
For ammunition….8 x 3-ton lorries…..16 drivers
For baggage and stores….3 x 3-ton lorries….6 drivers
For personnel….1 x car….1 x driver
For personnel….7 x motorcycles
For supplies….1 x 3-ton lorry….2 drivers
Spare…. 1 x 3-ton lorry….2 drivers
Each battery was also supplied with one water tank.
Battery Personnel.
Major 1
Captain 1
Subalterns 4
BSM 1
BQMS 1
Sergeants 5
Smiths 2
Wheeler 1
Trumpeter 2
Corporals 6
Bombardiers 6
Gunners 100. This includes 8 acting
Bombardiers and 21 Signallers and Telephonists
Batman 6 [for the 6 Officers].
Total 136
Attached personnel
Army Ordnance Corps [A.O.C.] Armament Artificer 1
A.S.C.
Motor Transport [M.T.]
Subalterns 2
Sergeants 3
Batmen 2
Drivers - lorries 34
Motor car 1
Spare 15% 6
Total attached 49
Battery Grand Total [including attached] - 185
Gun Detachments.
The 4
guns each had 30 men split into 3 shift rotas (10 men per gun per shift) of 24
hour working plus signallers.
A sub section
comprised of about ten men and the functions of each man in the sub section was
identified by a number from 1 to 10. The list below explains the basic functions
for each member of the gun detachment.
No.1 The gun commander responsible for
supervising the actions of all other members of the detachment and gives the
order to fire.
No.2 Opens and closes the breech, puts the gun in and out of firing position,
operates the right brake once gun is laid and fires the gun.
No.3 With number 5 rams home the round. Uncaps fuses. Operates the left brake
once the gun is laid.
No.4 Acts as gun layer with number 1.
No.5 With number 3 rams home the round and assists number 10 with cleaning and
preparing fuses.
No.6 Prepares, fetches and loads shells
No.7 Carries shells to the gun. Assists number 10.
No.8 An NCO, prepares charges and keeps records of charges.
No.9 Carries shells to the gun. Assists number 10.
No.10 Issues shells and ensures shells are clean and fused.
No.1 was a Sergeant, and commanded the sub-section.
A Subaltern commanded a section of two guns.
6”
Howitzers
A quadruple driven lorry [gun tractor]
3-ton
lorries